Since we first started this web journal a very long time ago, the way in which we’ve used it has changed and evolved over time.

In the early days, pre-dating most social media, when one actually regularly read ‘blogs,’ we used it to share half-formed ideas, project work, case studies, food we liked, images, and music. There was even a time, when we first moved the studio to Los Angeles, when we made a point to post every day.

As tastes, habits, and technology have all changed around and within us, so to has how we use this space. We now use it less in general—a lot less—relying more on Instagram, mostly, to connect with audiences. It’s also become a personal repository for recipes that we adapted and/or developed ourselves through the years, so this journal has evolved into a kind of ever-growing cookbook for us too, allowing us to find and use recipes we don’t really have recorded anywhere else. And some of those recipes are ollllllllld.

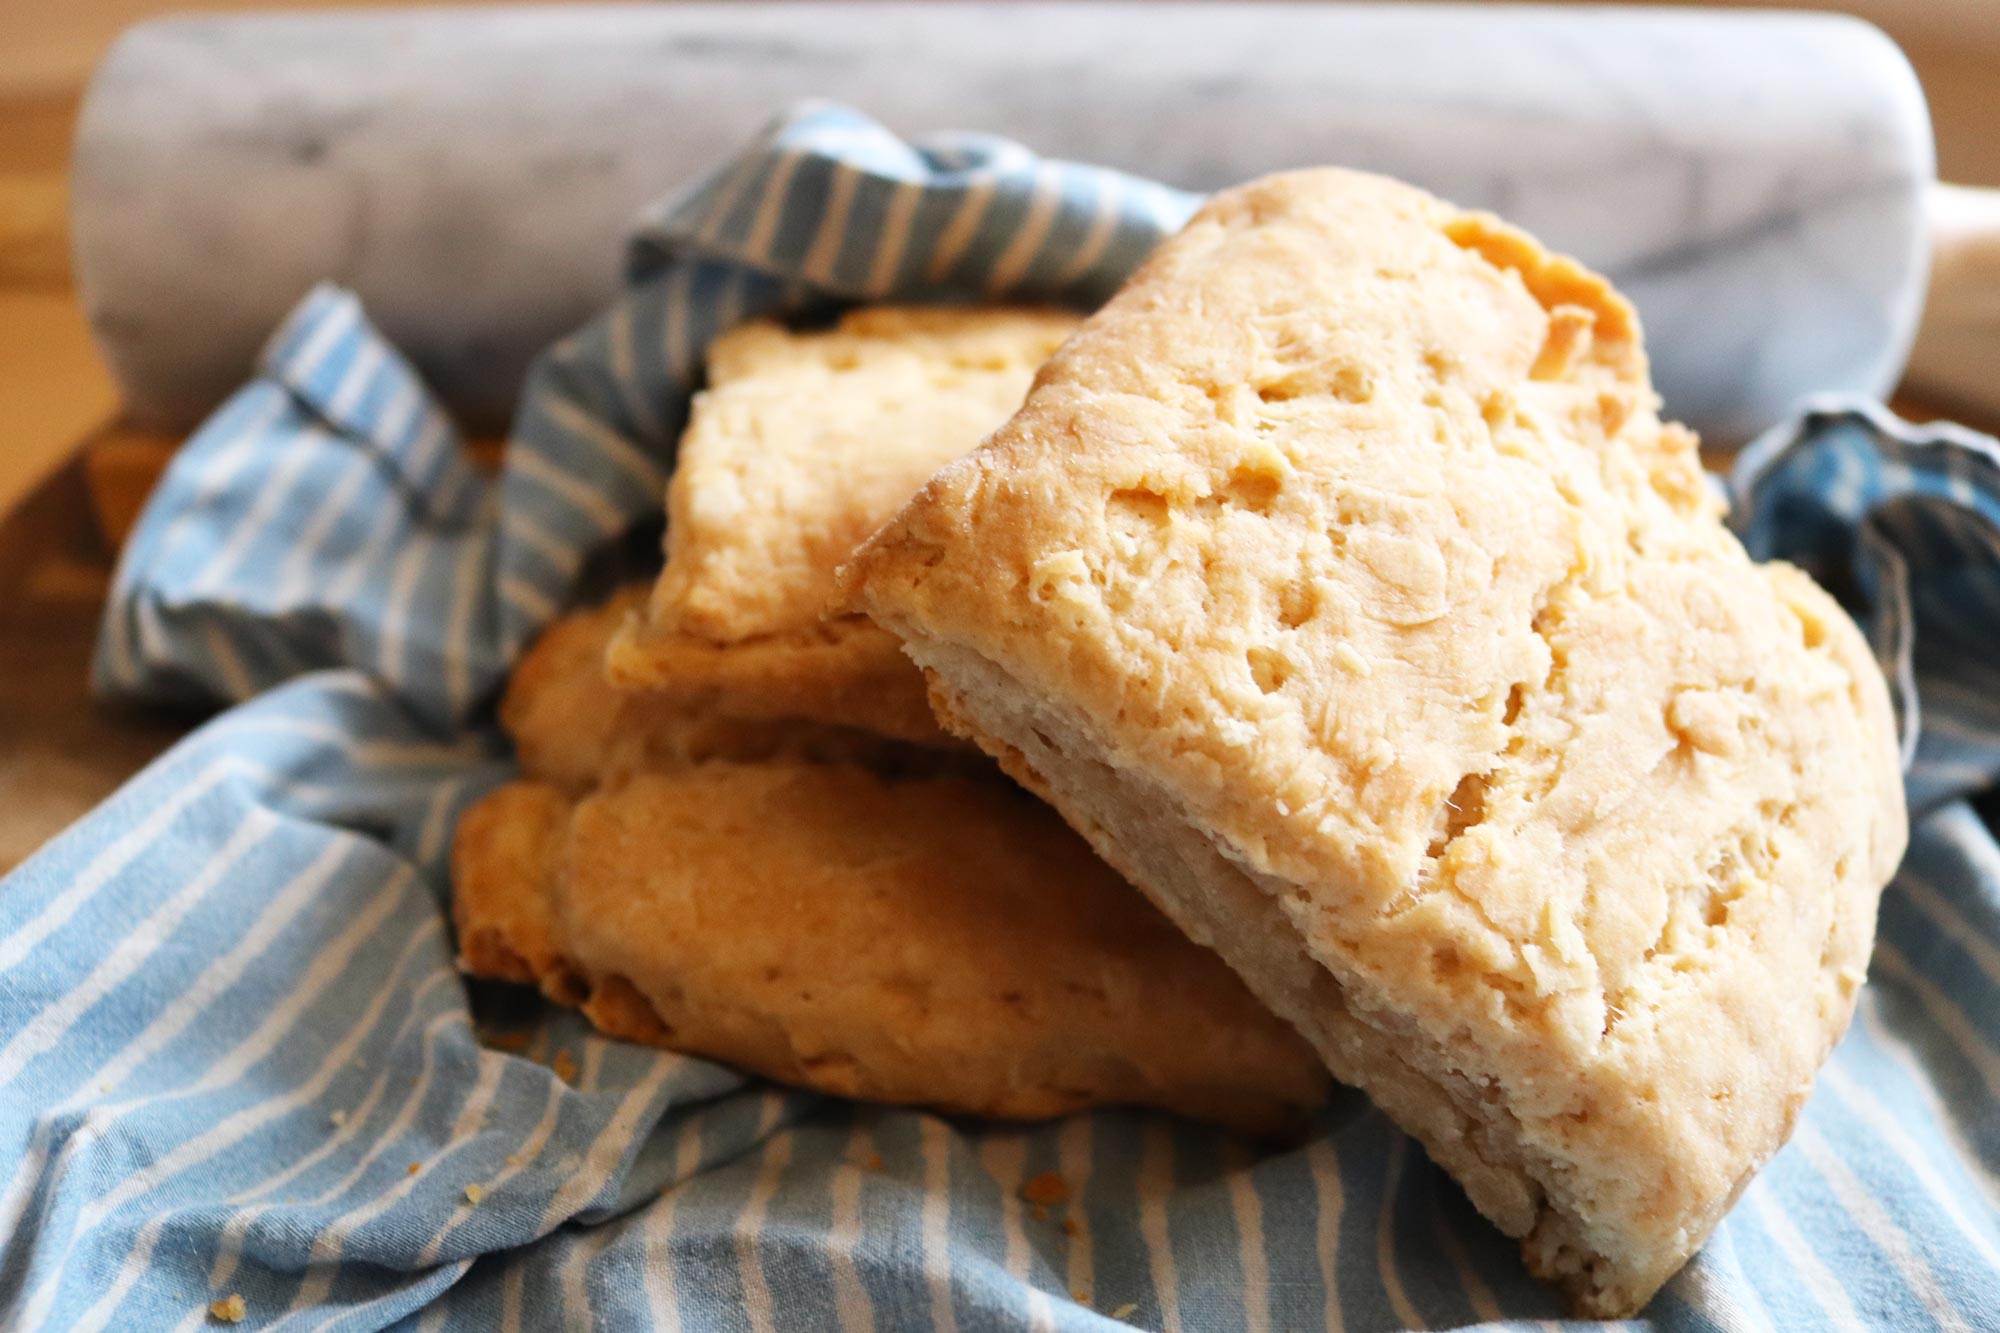
Case in point, we recently sought out our vegan buttermilk biscuit recipe—one we’ve used regularly for years—and realized that we created it almost twelve years ago. The recipe is a solid one and really hasn’t changed that much, but we still thought it worth a re-post so many years later with some slight tweaks and new photos.

As mentioned in the original post, the recipe developed from that of the notable buttermilk biscuits made at NYC’s Waverly Inn—a venerable spot in the city for high-end versions of southern American food.

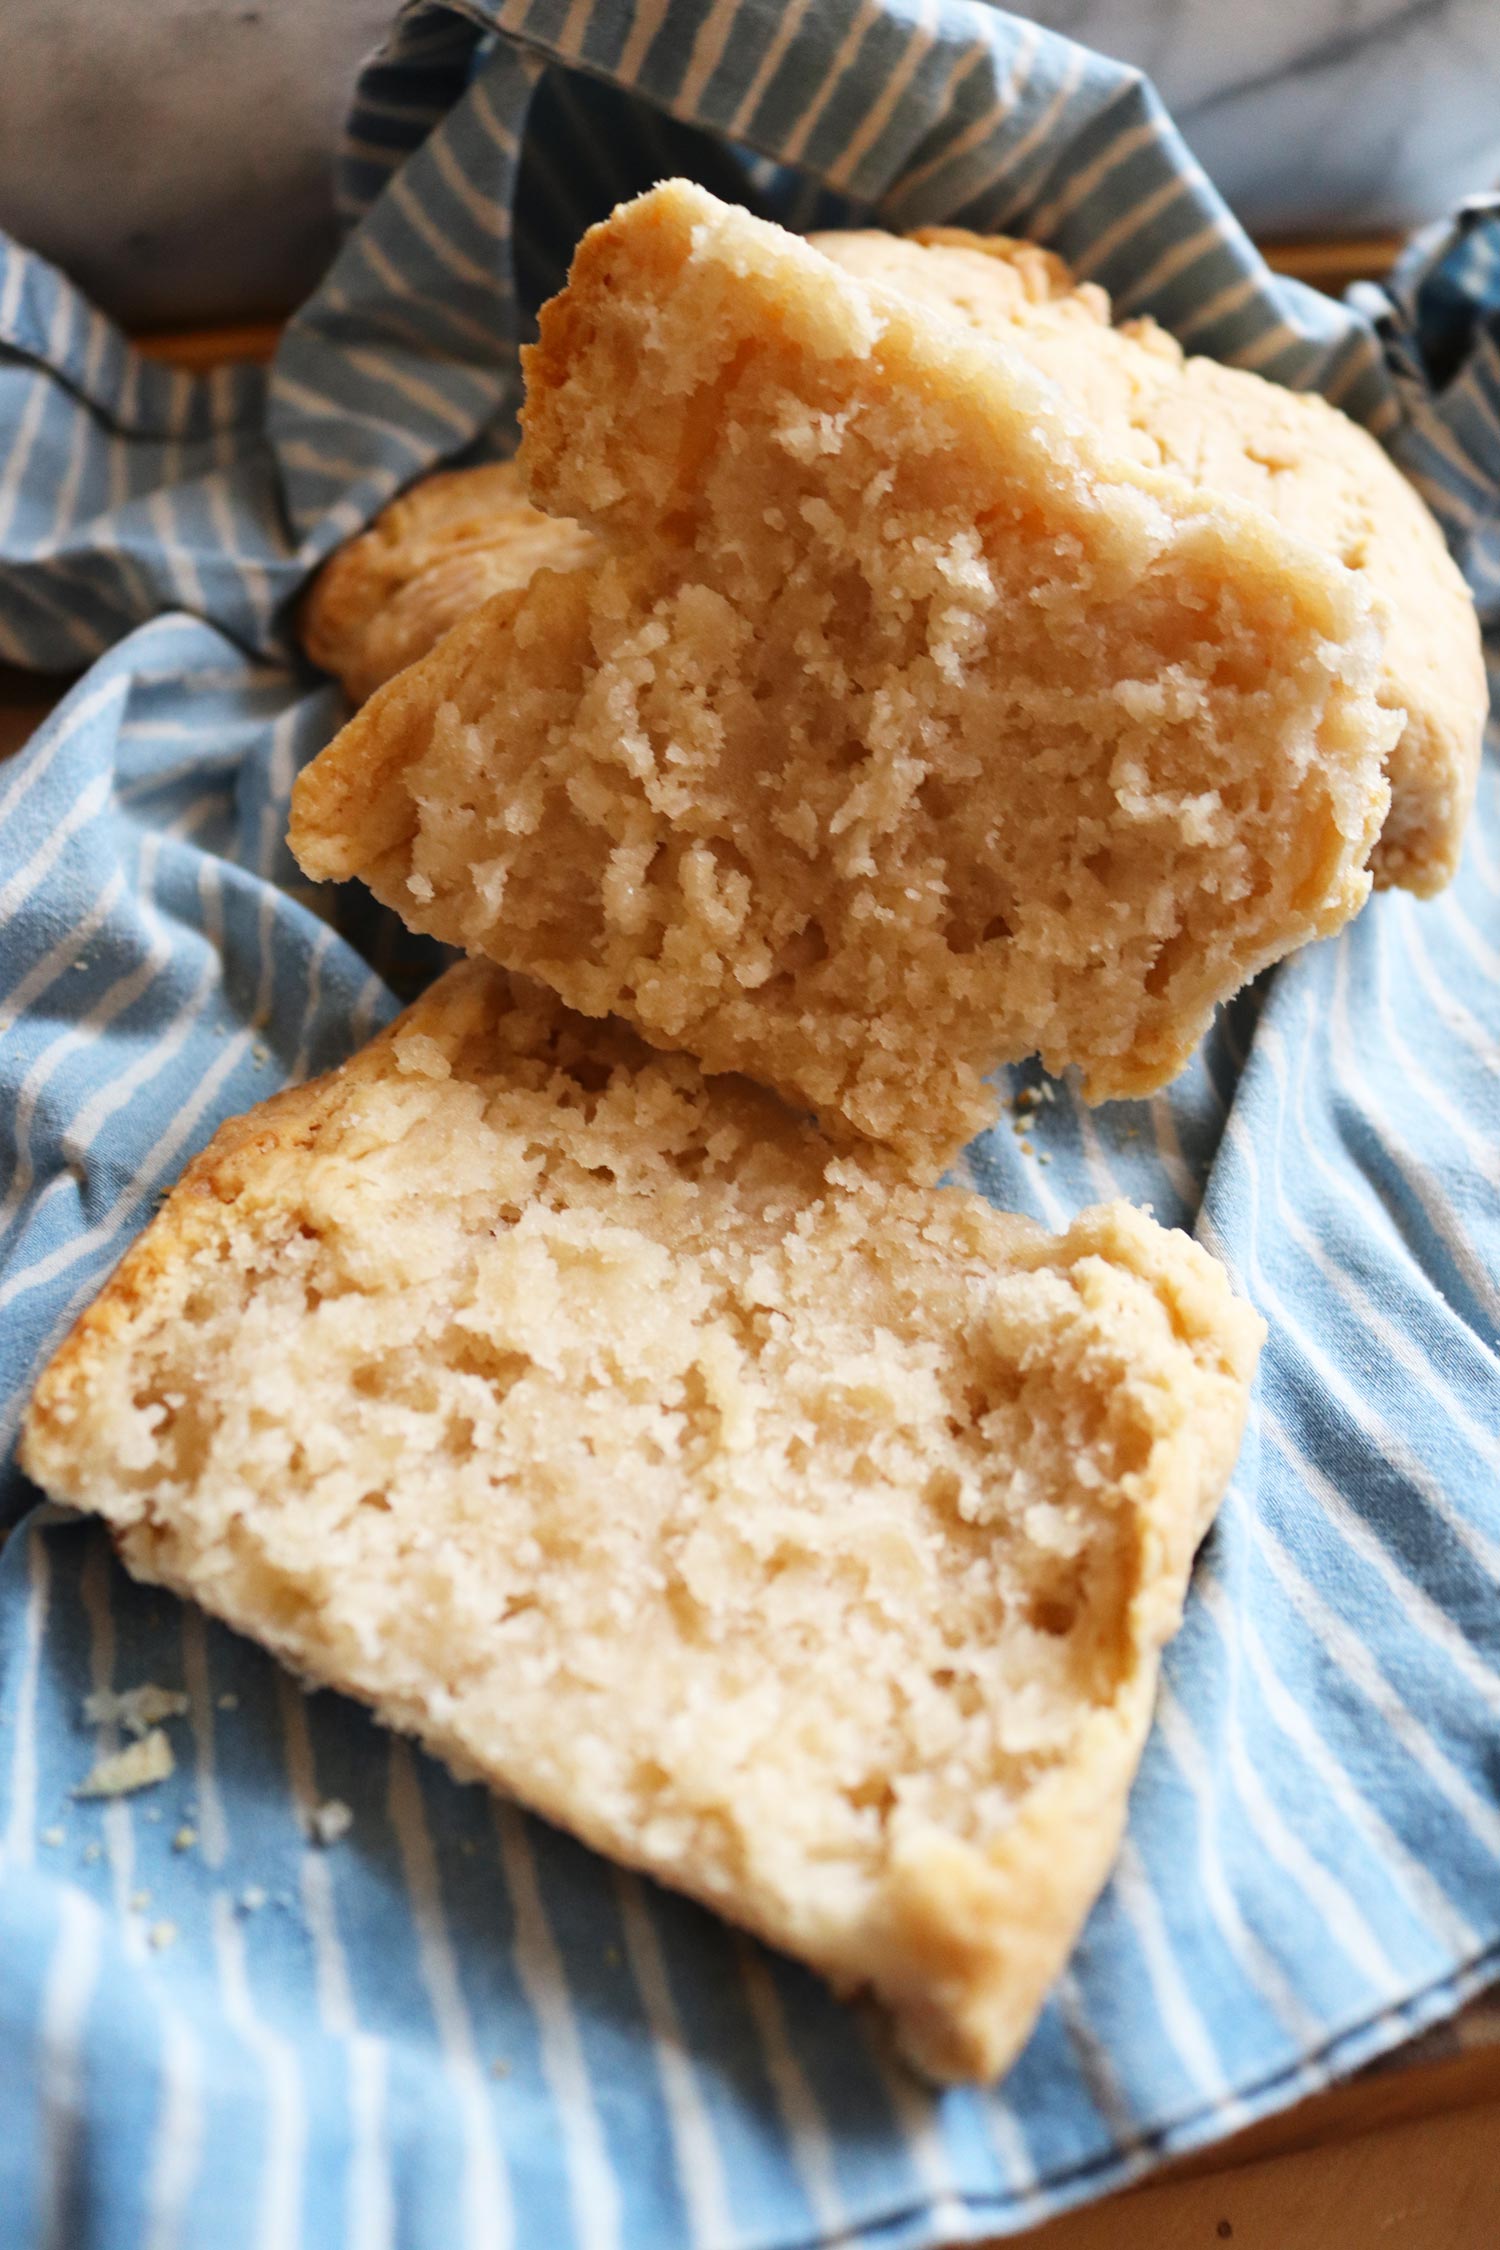
Go savory or sweet with these biscuits, splitting them and covering them with a plant-based sausage gravy, slathering with vegan butter and freshly made jam, or stacking them up into a nice sandwich. Regardless of how you use them, though, we still highly recommend enjoying them right out of the oven, warm and crumbly and delectable. Our primary pointers for this recipe are combining the plant milk and vinegar beforehand and giving it time to ‘curdle’ in order to separate the two tastes within the finished product, and then keeping the crushed butter bits as cold and whole/un-melted whilst working the dough, which means touching the dough with your warm hands as little as you can get away with. Here’s what you need:

• 2 Cups Unbleached All-Purpose Flour (see note)
• 1/2 Tbsp Sea Salt
• 1/8 Tsp Baking Soda
• 1 1/2 Tbsp Baking Powder
• 1/2 Tsp Sugar
• 1/4 Lb. Cold Vegan Butter (see note)
• 3/4 Cup Unsweetened Plant Milk (see note)
• 1/4 Cup Apple Cider Vinegar

In terms of ingredients, with the plant milk, use whatever you like, just make sure it’s unsweetened, ideally. We usually use an unsweetened soy milk or a slightly-watered down soy creamer (since they’re so rich). For flour, we usually used cooperatively owned King Arthur brand unbleached all-purpose; in recent years, we’ve spoken with others who know flours and baking much better than we do and they swear by Central Milling and their ultra-pure, additive-free flours, but that can be harder to find depending on where you are. Butters—we love European Style Cultured Vegan Butter from Miyoko’s Creamery—it’s pricey, but the butter’s pretty key in this recipe, so it’s important that you’ve got one you like a lot.

First, in a measuring cup, first combine the plant milk and vinegar; set aside. If you don’t want that buttermilk tang or want less, adjust the ratio so there’s less vinegar relative to the milk or omit the vinegar altogether.

Combine the dry ingredients in large bowl. Take the butter and, with a cool, sharp knife, cut first into rows and then into small cubes, maybe half-an-inch or so each. Do this a little bit at a time, again, handling the butter as little as possible, and add to the dry mixture, stirring gently as you go with a wooden or metal utensil to cover each little cube with the flour mixture (so the pieces don’t stick together as you add).

Once all the cubes are added, with a large metal fork or other utensil, crush the cubes into smaller, pea-sized pieces, cutting the butter into the flour mix. Be very thorough with this part, making sure you break up all the cubes into tiny pieces—this is what makes the biscuits flaky.

Slowly add what should now be a curdled looking milk-vinegar mixture to the flour-butter mixture as you stir. The finished dough should look pretty shaggy and a little wetter than most doughs you’re likely used to.

Liberally flour a clean counter or cutting board and turn the dough out onto it. Sprinkle some flour on top of the dough and, using a scraper, spatula, or your hands ever-so-briefly, gently fold the dough over itself three or four times, creating layers that you’re carefully evening out a bit each time you fold the down over itself.

Using a rolling pin, gently roll the dough out so it’s an inch or two thick. You can form an oval or keep the edges rough, for a more rustic look. Now, before putting the dough in the over, cut your biscuits out with either a knife or a biscuit-cutter if you want them round. We usually form a long rectangle and cut nearly all the way through down the length, then again a few times width-wise to form the biscuits, so you still have one largely whole mass that can be broken into biscuits once baked and no dough is being discarded.

Put the formed biscuits on a baking sheet and, if you like, refrigerate them covered until you’re ready to bake at 375 degrees. They should only take 15-20 minutes, but just keep an eye on them—they’re done when the get a golden brown look along the edges.

Enjoy!

Last week, via our vegan food account on Instagram, we posted a picture of a vegan challah bread that we made. The bread—a first for us—not only came out looking beautiful, it also tasted amazing.

All of which we owe to the mad culinary skills of our friend Roxy Storm back in LA, who developed the recipe. Roxy—picture below with an enormous and outstanding quilt she knit—developed the recipe and was kind enough to share it with us.

roxy
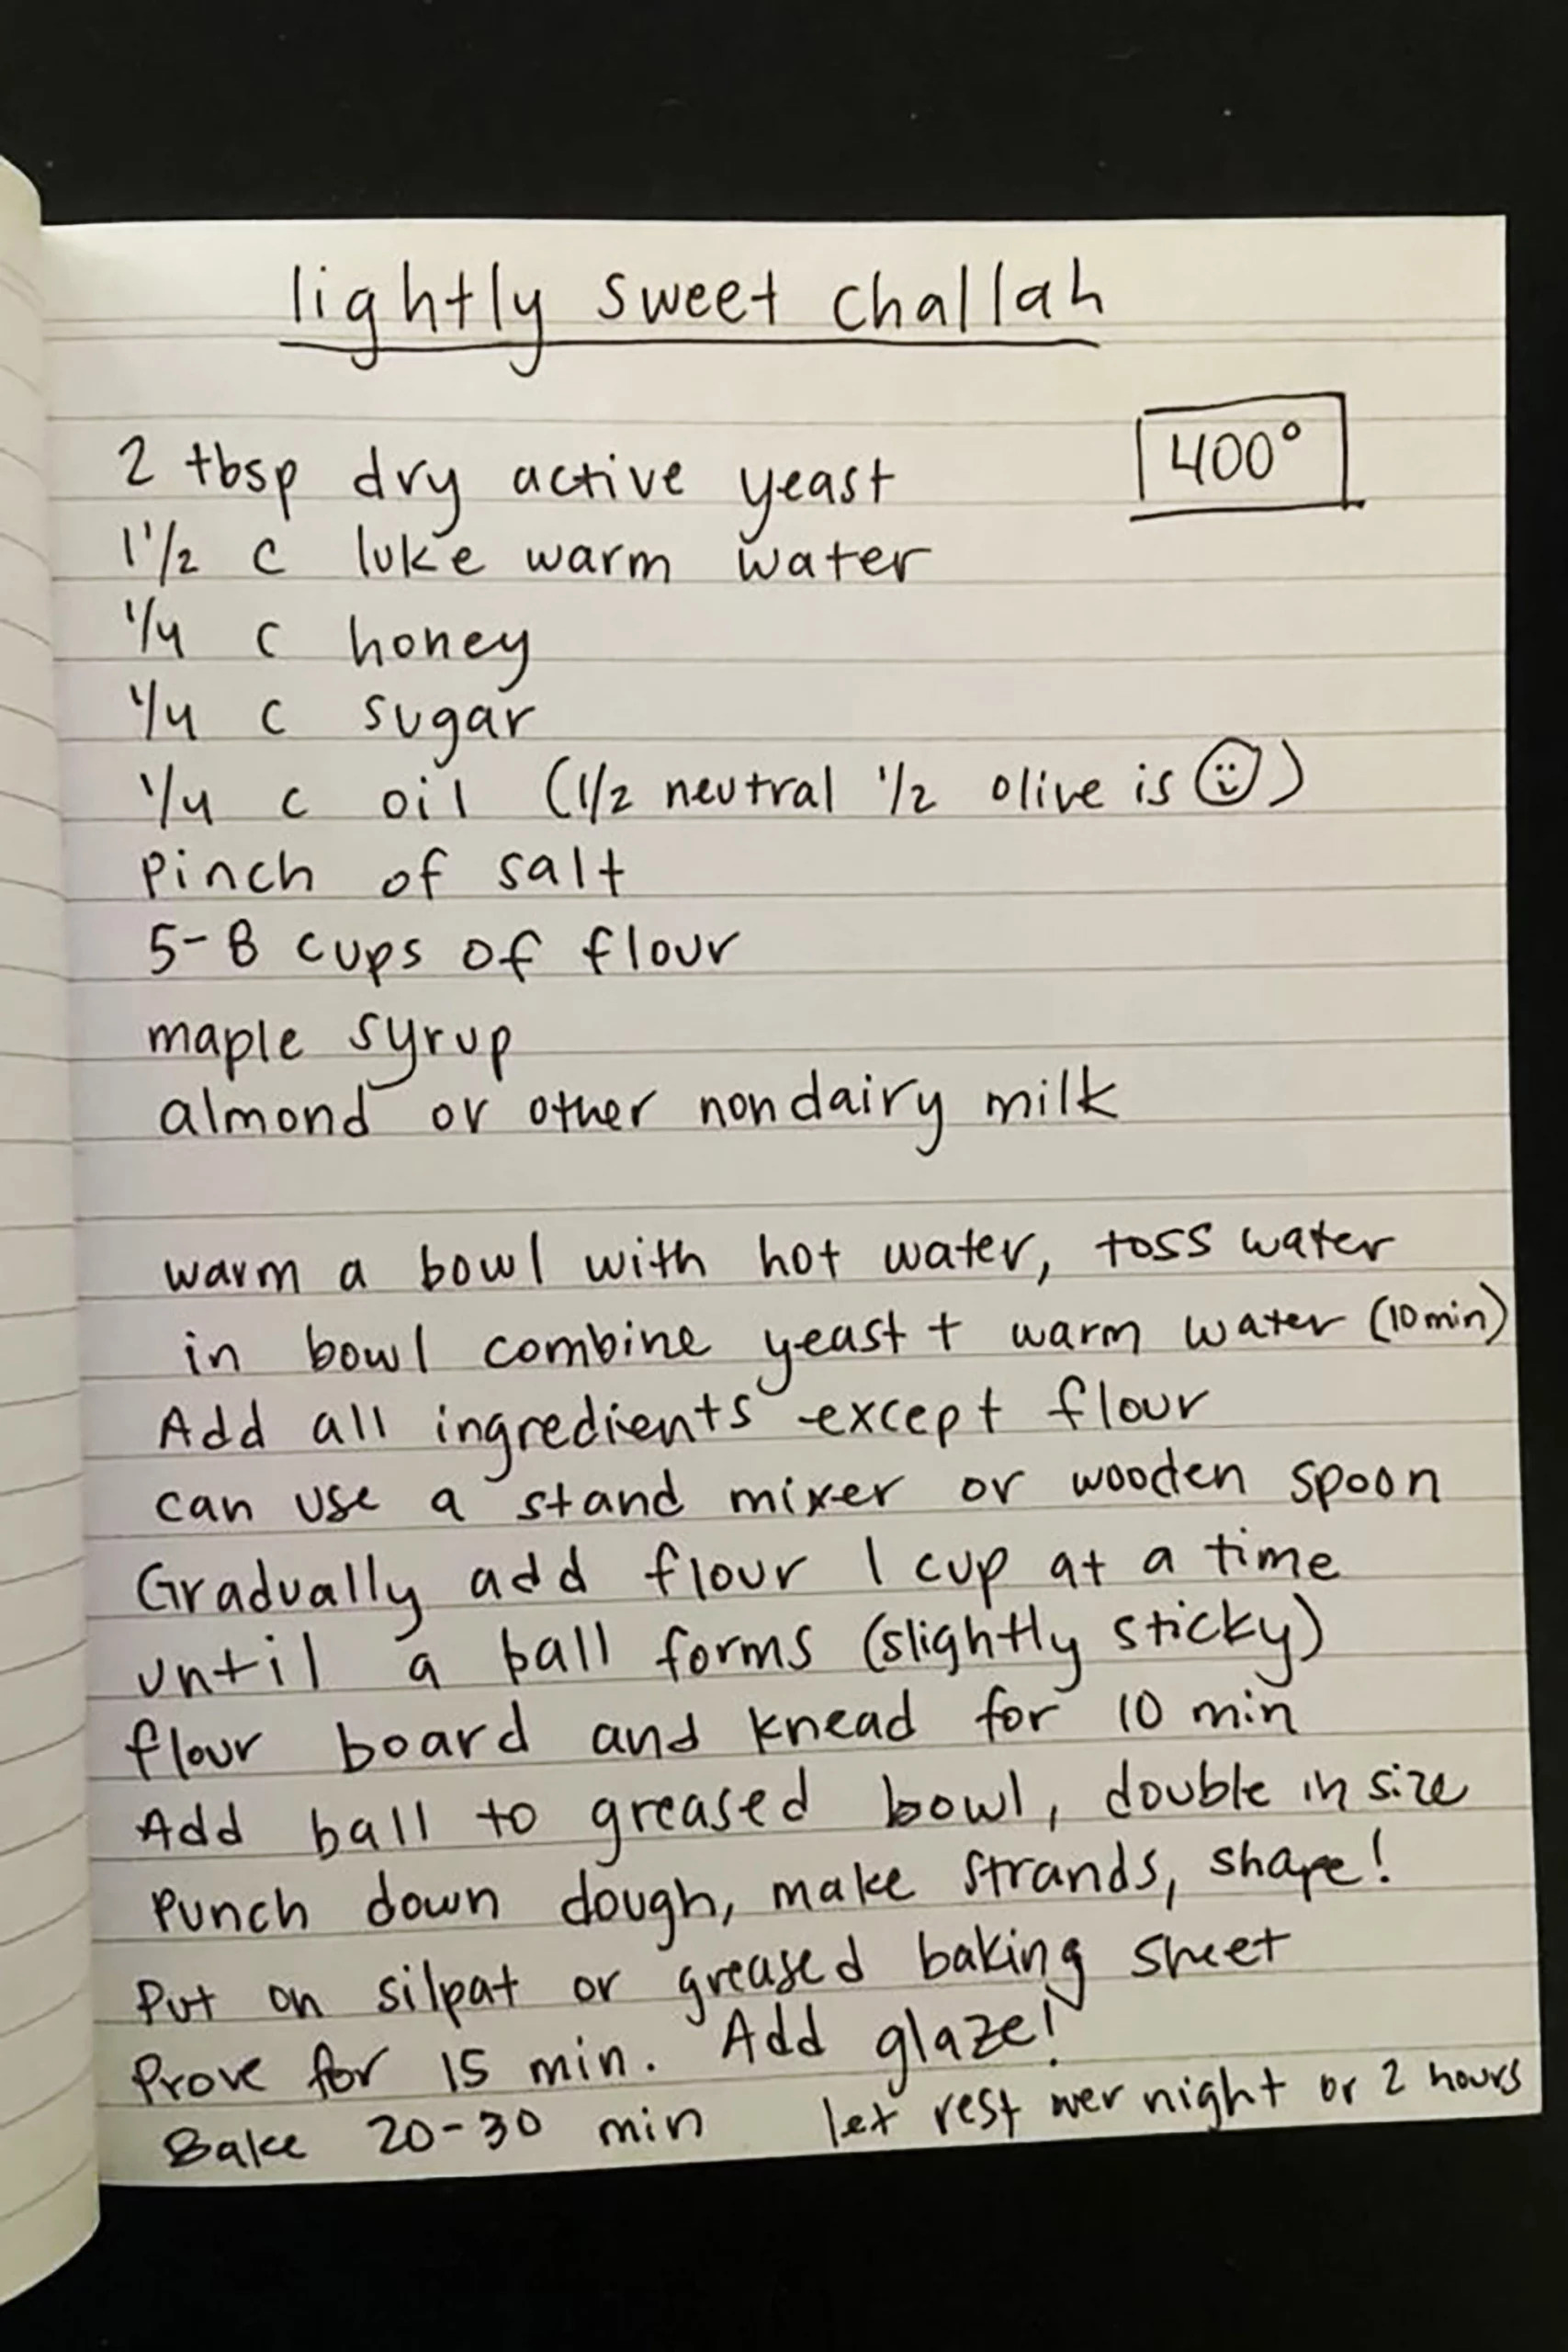
Kinder still, she agreed to have us share it here after some friends asked on IG. So here it is, written out by Roxy. And feel free to follow Roxy’s knitting and make inquiries over at Roxy Storm Fiber Art on IG. Thanks again, Roxy!

Oh, and if anyone’s wondering, the beautiful stained glass trivet was made by Debbie Bean, another talented Los Angeles artist.

recipe

challah

Years back, when we lived in Brooklyn still, we attended an event held  by NYC’s Greenmarket commemorating New York’s annual Pickle Day. And yes, that is a real thing. The event included a whole slew of vendors selling and discussing pickles and fermented fare that went well beyond your average cucumber pickle. At it, we were lucky enough to meet Lauryn Chun, founder of Mother-in-Law’s Kimchi, and hear her speak about the history of kimchi and pickling in Korea and how it tied in to cross-cultural fermentation worldwide. Her excellent book—The Kimchi Cookbook—had yet to be published then, but as soon as it was, we made sure it had a home in our house.

The primary go-to recipe for us and one we make most regularly is her write-up of traditional stuffed cabbage kimchi, or poggi kimchi—a whole napa cabbage kimchi that’s slowly fermented in a crock and lasts for months. But we recently made her for daikon radish cube kimchi (kkakdugi), inspired by the cookbook’s accompanying shot of the kimchi being used in a scrumptious-looking sandwich (beautifully shot by Sara Remington). As Ms. Chun writes, the bite-size cubes of the kimchi showcase the spicy, thick sauce that marries well with the radish’s crunchy, juicy, refreshing texture. After napa cabbage kimchi, kkakdugi is one of Korea’s most beloved and commonly consumed kimchi, often accompanying the Korean soup, seollungtang.

We reached out to Lauryn to ask if she’d be alright with sharing the vegan version of her recipe with our shot of the veganized sandwich—made with our favorite mock duck—and she kindly granted us permission. So here it is.

Prep: 30 minutes
Brine: 30 minutes
Fermentation: 3 to 4 days
Makes 8 cups (10 to 12 servings)

Brine
4 pounds daikon radishes (about 2 to 3 large)
2 tablespoons kosher salt

Seasoning Paste
1/2 cup sweet rice-flour porridge (see below)
2 tablespoons pureed salted apples (see below)
1 tablespoon minced garlic
2 teaspoons peeled, finely grated fresh ginger
1 tablespoon sugar
2/3 cup Korean chili pepper flakes
1/4 cup vegetable stock (optional)
4 green onions, green parts only, cut into 1-inch pieces (about 1/2 cup)
1/3 cup water

So the only modification to this recipe we’re making is subbing in vegetable stock for beef stock—Ms. Chun actually has a recipe for a mushroom stock in her book that’s perfect for this, but you can use a homemade or store-bought stock too—and then we’re subbing out salted shrimp. In it’s place, we’re using a slated apple puree. This is something she recommends early on in the book to achieve the desired umami or funk of kimchi but without shrimp or fish. She recommends a ratio of 1 teaspoon salt per 1/2 cup of puree. You can also use pears or onions in the place of apples.

Then the sweet rice-flour porridge—a staple of kimchi paste ingredients that “acts as a binding agent and makes the seasoning more viscous”—is another recipe from The Kimchi Cookbook and can be made in a larger batch ahead of time. Prepare an ice bath and, in a small saucepan, bring 3/4 cup of water to a boil. Meanwhile, dissolve 2 tablespoons of sweet rice flour in 1/4 cup of cold water. Whisk the flour mixture into the boiling water and stir for 15 to 30 seconds, until the mixture thickens and resembles white glue. Remove from the heat and set in the ice bath to cool. When cool, remove from the ice bath. Allow to cone to room temperature, stirring for 5 to 10 minutes. If you’re making it ahead of time, you can store refrigerated in a container up to 3 days.

Finally, if you’re in need of Korean chili flakes—gochugaru—and don’t have a Korean market nearby or just aren’t comfortable shopping in stores, we highly recommend ordering them from Los Angeles’ Mama Kim’s Kimchi via Etsy.

Now, on to the kkakdugi:

Using a paring knife, trim the radishes and scrape away the outer grimy layer. Do not peel the entire outer layer of the radish; the skin is needed to maintain firmness while pickling. Cut the radishes into 3/4- to 1-inch cubes—it’s okay if some pieces aren’t exact.

In a large colander, sprinkle the radish cubes with the salt and let them brine for 30 minutes. Drain the radishes and set them in the colander over a bowl to drain some more.

Meanwhile, make the seasoning paste. In a mini food processor fitted with a metal blade, pulse together the porridge, salted apple puree, garlic, ginger, and sugar until a paste forms. Transfer the mixture to a medium bowl and stir in the chili pepper flakes and stock. Set aside for about 15 minutes to let the flavors combine.

In a large bowl, combine the drained radishes with the seasoning paste and green onions until the seasoning paste is evenly distributed throughout. Pack tightly into two quart-size containers. Add about 1/3 cup water to the mixing bowl and swirl the water around to collect the remaining seasoning paste. Add a few tablespoons of the water to each container. Cover tightly and let sit at room temperature for 3 to 4 days. Refrigerate and consume within 6 months.

Like a lot of you reading this, we significantly scaled back our Thanksgiving this year, foregoing the big “Friendsgiving” we usually host for obvious reasons and making far less food than usual. One planned dish we were excited about got cut at the last minute—Andrea Quynhgiao Nguyen’s Sticky Rice and Chestnut Dressing from her book Into the Vietnamese Kitchen: Treasured Foodways, Modern Flavors. But we made it the following week and stuffed it into a kabocha squash to serve as a main dish and it came out wonderfully.

So we asked Andrea if we could share that recipe—which we originally heard about in an interview with Frances Lam on NPR’s Splendid Table—in hopes that it would inspire others to make a vegan version this holiday season. To our delight, she agreed.

As Andrea notes in the recipe, when Vietnamese cooks make stuffing, they often rely on sticky rice, in a cultural bridge between Vietnamese and French traditions. They also often use lotus seeds, but her family prefers the taste of chestnuts, as do we, especially this time of year when they’re more readily available. As Andrea originally notes, you can stuff something with this recipe—like the kabocha, as we’d recommend—or you can have it as a side and cook it on its own, giving the grains on the bottom a nice, crispy crust. She’s also got some tips for anyone who’s never shelled or cooked with chestnuts below.

If you do decide to stuff a kabocha or other squash, simply halve it carefully, scrape our the seeds and stringy bits, pack the stuffing inside after cooking as detailed below, and rather than bake on its own as described below, bake in the squash at 400°F for an hour or so, until the squash’s outer skin is tender to a fork. In addition to the cilantro, we topped ours, pictured above, with some fermented sriracha. Slight alterations made below to make this dish vegan, but if anyone wants the original recipe, Splendid Table has it up on their pages as of this posting.

And be sure to scroll all the way to the bottom of this post for Nico’s patented “Ta-da!”

Yield: Makes about 8 cups, to serve 6 to 8

INGREDIENTS
1 1/2 cups short-grain sticky rice
1 clove garlic, minced
16 oz. Beyond Beef (or Beyond Sausage, cut into small pieces)
8 dried shiitake mushrooms, reconstituted, trimmed, and chopped
1/2 teaspoon black pepper
1 teaspoon chopped fresh thyme (or generous 1/4 teaspoon dried thyme)
3 tablespoons Cognac
2 tablespoons finely chopped fresh cilantro

FOR THE CHESTNUTS
11/2 cups shelled and peeled chestnuts (3/4 pound unpeeled), halved lengthwise (see note)
1 tablespoon vegan unsalted butter
5 sprigs cilantro
2 cups canned low-sodium vegetable broth, or as needed (ideally homemade)
1 teaspoon salt
4 tablespoons vegan unsalted butter
1 small yellow onion, finely chopped

Put the rice in a bowl and add water to cover by 1 inch. Let stand for at least 2 hours (or even overnight).

To prepare the chestnuts, place them in a small saucepan in which they will fit in a single layer. Add the butter, cilantro, and broth to cover by 1/2 inch. Bring to a simmer, cover partially, and simmer gently for about 20 minutes, or until the nuts are tender yet firm and still hold their shape. Do not allow the nuts to boil, or they will disintegrate. When they are ready, some pieces will be intact and others will have broken apart. Set aside.

Dump the rice into a colander and rinse under cold running water. Shake the colander to expel extra water and then return the rice to the bowl. Toss with 1/2 teaspoon of the salt.

Fill the steamer pan halfway with water and bring to a rolling boil over high heat. If you are concerned about cleanup and/or the rice falling through the holes of the steamer tray, line the tray with a piece of parchment paper or banana leaf, leaving a few holes uncovered for heat circulation. Pour the rice into the tray, keeping it 1 inch away from the edge where condensation will collect.

Place the tray in the steamer, cover, and steam the rice for 20 minutes, or until the grains are shiny, tender, and slightly chewy. To ensure even cooking, give the rice a big stir with chopsticks or a spatula 2 or 3 times during steaming. Take care when lifting the lid that you don’t allow any condensation to drip onto the rice and that you are not burned by the steam. At the end of each stirring, gather the grains back into a mound in the center, leaving a 1-inch border between the rice and the edge of the steamer tray. When the rice is done, turn off the heat and leave the rice in the steamer while you ready the other ingredients.

In a large skillet, melt 2 tablespoons of the butter over medium heat. Add the onion and garlic and sauté for about 2 minutes, or until fragrant and soft. Add the Beyond Beef or other vegan protein, pressing and poking it to break it up into small pieces, and cook and stir for about 2 minutes, or until half done. Add the mushrooms, pepper, thyme, and remaining 1/2 teaspoon salt and continue to cook, stirring often, for 2 minutes, or until the protein is well-browned. Remove from the heat.

Position a rack in the middle of the oven and preheat to 400°F. Butter the bottom and sides of a 9-by-13-inch baking dish (or baking dish of similar size) with 1 tablespoon of the butter. Transfer the protein mixture and any juices to a large bowl and add the rice and Cognac. Use a rubber spatula or 2 spoons to combine the ingredients well, breaking apart any large clumps of rice. Discard the cilantro sprigs from the chestnuts and drain the chestnuts, reserving the liquid for a sauce or a soup if desired. Add the chestnuts to the rice mixture along with the chopped cilantro and mix together gently. Taste and adjust with more salt, if necessary. (The dressing may be prepared to this point up to 1 day in advance. Cover partially to prevent drying and let cool completely, then transfer to an airtight container and refrigerate. Bring to room temperature before baking.) Transfer the dressing to the prepared baking dish (or stuff into a squash now, as noted above). Cut the remaining 1 tablespoon butter into bits and use to dot the top evenly. Cover the dish with aluminum foil.

Bake the dressing for 35 to 40 minutes, or until heated through and the bottom browns. Although the top will not brown, some grains at the edge will brown. Remove from the oven and let cool for 5 to 10 minutes before serving.

NOTE:

Chestnuts are in season in the late fall and early winter. Select shiny nuts that feel heavy for their size and store them in a cool, dry place. Be sure to use them while they still feel full and heavy. Or, freeze them unshelled for up to a year and thaw in the refrigerator before using.

To shell and peel chestnuts, first cut a cross on the flat side of each nut with a sharp paring knife. To do this, place the nuts on a dish towel so they don’t roll away. Preheat a toaster oven or a regular oven to 400°F and place the nuts, cut side up, directly on the rack (use the middle rack of a regular oven) or in a shallow pan. Bake them for about 5 minutes in a toaster oven or 10 to 15 minutes in a regular oven, or until the chestnuts feel hot and the cut on each shell opens and curls.

Carefully transfer the hot nuts to a dish towel, wrap them up, and squeeze the bundle to crack their shells. Working with 1 nut at a time and using the paring knife, remove the smooth outer shell and then peel, scrape, and/or cut off the papery inner brown skin. Use the knife tip to pry out skin bits stuck in the crevices. It is okay if a nut breaks during peeling. As you work, keep the unpeeled nuts warm in the dish towel, so the shells remain pliable and easier to remove. You can shell and peel chestnuts up to 3 days in advance of using and keep them tightly covered in the refrigerator, or you can freeze them for up to 6 months.

Reprinted with permission from Into the Vietnamese Kitchen: Treasured Foodways, Modern Flavors by Andrea Quynhgiao Nguyen copyright © 2006. Published by Ten Speed Press, an imprint of Penguin Random House.

Our lives often seem to revolve around food, we’ve found. Be it planning our day around a big dinner we’ll make in the evening or a new restaurant we’re venturing out to for lunch, food often brings us experiences that aren’t necessarily confined to the culinary world. That was the case in pre-COVID times, it’s the case now, in the midst of this pandemic, and we fully expect it to be the case in whatever post-COVID times look like.

All of that seems to be playing out on these pages of late too—in the previous post regarding food, I alluded to some big life changes we’d experienced of late.

Though we truly + dearly love Los Angeles and the community of friends + neighbors we’ve built up there over the past seven years, we’ve felt the pull back east to our mutual home state of Virginia for a time now, largely so we could be closer to family. We had to fast-track all of that consideration + planning for reasons I won’t go into here. Some of the results, though, were a sudden necessitated cross-country flight for all of us followed by a solo flight back to LA for me (Troy), where I packed up our home + office for movers who came less than a week later—on Halloween morning, actually—and a drive across the US with cats and dog and sundry other items in the car (mostly plants + pizza). So, suffice to say, it was a stressful, hard time for all of us; it still is, to be honest.

Typically, habitually, we’re not ones to lean on friends or ask for help—we don’t want to put people out and like to do things for ourselves. If we can’t do it ourselves, maybe it shouldn’t be done, our collective line of thinking usually goes. But in these times, we’d tried to set that mindset aside as friends and neighbors repeatedly offered to help in myriad ways and we came to the realization that we needed that help to do things that had to be done. Our friends + neighbors Dave + Allison brought our ’92 Volvo 240 down to our trusty mechanic Art in Bellflower (shout-out to Fjords of Sweden, the best Volvo mechanics around); our friend Becky picked me up from LAX, which we’ve never asked anyone to do for us; our next-door neighbor, Matt, shipped the ancient first Mac laptop I bought in 2002 but accidentally left behind to us here in VA (still works, by the way); friend, studio mate, and illustrator Stacy Michelson helped out closing up the studio after I left town; and our friend and former companion animal/kid sitter, Angela—pictured below at said kid’s birthday this past February—watched our animals while we were away, helped me pack, and did basically anything else asked of her in that blur of hurried days I was back.

Knowing how much we both hate food waste, she also took the wealth of farm fresh vegetables we had just received from Edible Gardens LA and made a wonderful soup for me to enjoy that night I got back after what felt like an endless day of changed planes, travel delays, stressful distancing from unmasked strangers in airports, and non-stop worry.

All a long, winding, personal way to get to the fact that our friend Angela found the recipe for this supportive, sustaining soup in our copy of Mark Bittman’s classic cookbook How to Cook Everything Vegetarian. I reached out this week to Mr. Bittman, asking if it’d be alright for us to post that recipe here on these pages, not really expecting a response back from such a busy guy and, to my delighted surprise, he wrote back the next day with some kind words and permission to share that recipe, so here it is.

Mixed Vegetable Soup, Spanish Style (p124 of How to Cook Everything Vegetarian, 2007, Mark Bittman)
1 large onion, roughly chopped
1 head garlic, separated into cloves and peeled
1 medium eggplant, peeled and roughly chopped
2 medium zucchini or summer squash, peeled and roughly chopped
1 potato, peeled and roughly chopped
2 large tomatoes, cored and roughly chopped, juices reserved
1/2 cup extra virgin olive oil
salt and freshly ground black pepper
1 teaspoon ground cumin
6 cups vegetable stock (ideally homemade) or water
1/2 cup chopped parsley leaves

Preheat the oven to 450°F. In a roasting pan or oven-proof and stovetop-safe casserole dish, combine the onion, garlic, eggplant, zucchini, potato, tomatoes, all but a tablespoon of the olive oil, a large pinch of salt, some pepper, and the cumin. Toss so that all the vegetables are coated with the oil and roast, shaking or stirring occasionally, until the vegetables are nicely browned, about 45 minutes.

Carefully move the pan to the top of the stove and add the stock and reserved tomato juice. Cook, stirring occasionally, until the vegetables are very soft, another 15 minutes or so. (You may prepare the soup in advance up to this point. Cover, refrigerate for up to 2 days, and reheat before proceeding.) Taste and adjust the seasoning.

At this point you have two options: cool slightly and purée about half the soup, then reheat, add the parsley and remaining olive oil, and serve. Or do not purée; simply add the parsley and oil and serve.

Not to start with TMI right off the bat when we have posted on these pages for the past few months, but we’ve had some big work + life changes of late. Resulting in the fact that I’m currently writing this from a desk in central Virginia, where we’re both originally from and where it’s currently feeling extremely autumnal. Maybe part of it’s having spent the last seven years in Los Angeles, but the general scene here has us vibing hard on fall. Leaves changing color, the crisp feel to the air, rainy days—it’s all got us feeling cozy and craving comforting foods.

Which led us to make a house regular for our toddler, Nico, but something we as adult don’t enjoy nearly often enough—pancakes. Or flapjacks or griddlecakes if you’re feeling particularly lumberjack-y. Our go-to recipe has long been from friend and über-vegan cookbook author, Isa Chandra Moskawitz, and her classic, Vegan Brunch, which you should buy (and/or, get her new book, I Can Cook Vegan).

We reached out this weekend to see if it’d be cool for us to post that recipe for Perfect Pancakes here and she said it was, so here it is (and thanks, Isa):

Ingredients:
1 1/4 cups all-purpose flour
2 teaspoons baking powder
1/2 teaspoon salt
1 teaspoon ground cinnamon
2 tablespoons canola oil
1/3 cup water
1 to 1 1/4 cups plant-based milk (soy, almond, oat, et cetera)
2 tablespoons pure maple syrup
1 teaspoon pure vanilla extract

So, not to dishonor the greatness of our friend Isa, but, as with many recipes, we do fool around with this one a bit usually, not that you have to. Ingredients and instructions are being shared as originally printed here, but we usually use fresh-ground cinnamon from a stick, because we really dig it. And we usually use that La Tourangelle Sun Coco Oil Blend because we also dig it. Then we usually opt out of the water, using all plant milk instead just to have them come out a little more richly (so, 1 1/3 – 1 7/12 [yes, I had to look that math up] plant milk). And sometimes we make them gluten-free or gluten-less by subbing half or all of the wheat flour with almond or rice or a combination thereof. But that’s it—no more messing around; this recipe really is pretty awesome, simple, and fool-proof.

So here’s how it reads in Isa’s book Vegan Brunch (and I think in Vegan with a Vengeance too, where it originally appeared).

Preheat a large skillet over medium heat for at least 2 minutes (and up to 5 minutes).

In a large bowl, sift together the flour, baking powder, salt, and cinnamon. Make a well in the center and add the oil, water, milk, maple syrup, and vanilla. Mix just until ingredients are combined. A few lumps in the batter are just fine.

Spray the pan with a light coat of cooking spray (or a very light coat of oil). Pour pancakes one at a time and cook until bubbles form and the top looks somewhat dry (about 3 minutes). Flip over and cook for another minute. Serve!

This past week, one of our all-time favorite Los Angeles restaurants, Burgerlords, made the move to go fully vegan.

The Chinatown burger stand and more recently opened Highland Park diner have always been ultra-vegan-friendly—with fully vegan from-scratch burger patties, tofu nuggets, and vegan-by-default tahini-based milkshakes—but, as longtime vegans and animal rights activists, we’re obviously thrilled with this decision. And, seemingly, the rest of LA is too—both locations entirely sold out of food this weekend, necessitating shut-downs Sunday as they prep for a Thursday reopening.

We’ve done a longer form interview here with Frederick Guerrero—one of two brothers and owners of Burgerlords. But this time, we just had one question: What precipitated the move to an all-vegan menu? Fred, pictured below, happily obliged us with an answer.

“I’ve been vegetarian since I was about 8 years old.  Growing up working in my family’s restaurant, I always wanted to have my own place that represented how I ate.  We’ve gone back and forth with the idea of going all vegan with the restaurants, so we figured that now was as good of a time as any to make the leap.  Sure, there are other factors related to COVID, but it was ultimately about having a business that I felt in control of and fully taking ownership of the restaurants.”

To this, we say—rad.

Full vegan menu below (click for a larger view). Both the Chinatown + Highland Park locations are now open for delivery + pick-up Thursday – Sunday, 12-8PM—order online via burgerlords.com.

You can read our 2016 interview with Fred if you like.

Top image, 2018 nugs + baby photo, and bottom image by us; all other photos by ASATO iiDA.


I’ve think we’ve talked about this here before, but we made a really, really big mistake post-college when we moved to New York City—we stopped being vegan. We were still vegetarians, we just started giving in to the early-aughts temptation of super-fancy cheese for a bit. This era of our lives was short-lived (we started to do more design + marketing work for animal rights orgs. and couldn’t keep ignoring the inherent violence + tragedy in the dairy industry), but it did bring into our lives some pretty amazing tastes that we then turned our backs on. One that we missed especially was that of gorgonzola—that intense, blue-and-green-veined cheese that brought together a rich butteriness with a tangy umami.

But a few months back, on a trip to our neighborhood vegan grocer, Besties, a new vegan blue cheese was recommended to us—Coco Blue, a vegan cheese that’s made right here in Los Angeles by Katona’s Creamery, who uses the same aging process as their dairy-based blue cheese counterparts. As fate would have it, Elizabeth Katona had just debuted the cheese at Bestie’s earlier that day. We took it home and tried it with crackers and were immediately brought back to those heady, dairy-eating days in our early twenties—it was dead-on and we’ve never had anything in our roughly one million years of being vegan that even comes close to this level of blue cheese authenticity. That first batch of Coco Blue quickly sold out and we’ve been champing at the bit for more ever since.

Until last week, when Elizabeth kindly delivered another batch to our doorstep (which she’s now doing in select areas with the city-wide COVID shut-downs). First order of business, try the new batch to see if it holds up (it did). Second order, make the blue cheese walnut risotto we made on the regular in Brooklyn, minus the dairy. We promptly did and it came out wonderfully, so we thought we’d share the recipe here. Bonus—if there are any left-overs, you can make arancini.

Coco Blue Risotto
◊ 1 cup risotto rice
◊ 4 ounces Katona’s Creamery Coco Blue vegan cheese
◊ 2 small/1 medium shallots, peeled + diced
◊ 4 tablespoons/2 ounces vegan butter (we like Miyoko’s)
◊ 2 tablespoons extra virgin olive oil
◊ 1 cup dry white wine (optional; if the percentage of alcohol is below 12, it’s likely too sweet/not dry enough)
◊ 1/2 cup walnut halves, lightly crushed by hand
◊ sea salt (to taste)
◊ a little of your favorite pretty green herb, mainly for show

So let’s start with the bad news—if you’re not in the Los Angeles area, sadly, you’re likely not going to be able to get this cheese. Amazing as it is (and it really, really is amazing), it’s really new to the market, made in very small batches, and not widely distributed right now. If you are in the Los Angeles area, we do highly recommend trying to get some. You can check with Bestie’s or message Elizabeth via Instagram to see if she can deliver in your area.

Some other options—depending on where you live, there may be some other local purveyors of vegan cheese who make a blue (we know our friends at NYC’s Orchard Grocer sell one by Cheezehound, out of the Catskills). And there are some recipes online for a homemade vegan blue cheese, none of which we’ve ever tried. Or, if you’re just looking to make a simple risotto and want to use this recipe as a template, you can do that too and skip the vegan cheese altogether. As someone told us years ago, the thing that makes good risotto creamy isn’t dairy, it’s the constant stirring and agitating of the rice grains that shed their outer starch over time as they’re cooked. So if you do that, maybe think about sautéing some chopped garlic in the butter + oil up front to add some flavor. Or use the more tame risotto as a base for some additional, more flavorful toppers, like spicy Italian vegan sausage.

Regardless, start by adding your risotto to 4 cups of filtered water in a large bowl. Some like to use broth here, which we’re usually all for, but we like a very clean, light-in-color risotto that’ll let the other flavors shine. Using a stock is going to give you a less subtle taste and more color than we care for in a risotto like this. Agitate the rice with fingers or a fork or whisk to release the starch into the water. Do this for a few minutes, until the water starts to become milky. Drain through a sieve over a bowl or other container, reserving the resulting liquid (we’ll add this later to give the dish a nice, thick fluffiness).

Now, setting aside 1 tablespoon/half an ounce of the vegan butter, melt the remainder in a skillet over low heat, mixing in the olive oil. Note: We usually use a cast iron for more everything; this is an exception, for the same reason we don’t use broth—this recipe’s shooting for that aforementioned tasty-but-clean base. If you don’t have or don’t want to use vegan butter, though, just supplement with the appropriate amount of olive oil (so, 5 or so tablespoon total). Now add the shallot and raise the heat to medium, allowing the shallot to caramelize and begin to become fragrant, but not overly browned (five or so minutes).

Carefully add your drained rice, continuously stirring and allowing it to sauté and brown a bit in the butter-oil-shallot mixture, which should smell pretty nice right about now. Carefully add the cup of white wine, continuously stirring (you’re basically stirring this whole time). If you don’t want to use wine, do this with additional filtered water instead or, if you want a little of the acidity that the wine gives the finished dish, add a little rice vinegar to your water.

From here on out, the name of the game is add liquid, cook it off (uncovered), repeat, always gently, thoroughly stirring and making sure the risotto isn’t sticking to the bottom of the pan. Once the wine’s gone, move on to the starchy water. Once that all cooks off, give the risotto a taste—it should, at this point, be fluffy and the cores of the grains of rice shouldn’t retain any residual hardness. If it’s not fluffy and entirely soft, add more filtered water 1/2-1 cup at a time and continue to cook off, salting to taste as you go.

While the risotto’s getting to a good consistency, in a second skillet (this one can totally be cast iron), melt the remaining one tablespoon of vegan butter (or heat equivalent olive oil) over medium-low heat and then add your crushed walnut pieces, stirring until browned evenly (this should just take a few minutes). Set aside away from heat.

Once the risotto is nice and fluffy and has a good mouthfeel and taste, add all but an ounce or so of the Coco Blue, chopping into pieces and stirring to incorporate into the risotto. It should give off a nice, blue cheese fragrance at this point. Plate and top with your browned walnut pieces, the remaining blue cheese, crumbled, and a little chopped rosemary, sage, or the like. Serve immediately and enjoy.

If you have any leftovers, why not make arancini from the refrigerated rice?

All you need to do is heat an inch or so of high heat cooking oil over high heat, roll the cold rice into balls about two inches in diameter, and then roll those in a bowl of rice flour, wheat flour, or really, any kind of flour with a little salt and maybe a little nutritional yeast (only if you have it). Then carefully add them to the oil with enough room between that they’re not touching. Carefully turn as they cook, browning to a golden brown on all sides. If you like, you can stuff a little meltable vegan cheese in the middle (we used a little broken up Follow Your Heart vegan Provolone and it worked great, creating a melty center). Serve with a nice pizza sauce for dipping.

Times are tough. Not only do we have to live with this constant fear of growing critically ill with a mysterious virus that no one exactly understands, but, to make matters worse, we’re having to do so while cut off from friends, family, and some of our favorite activities, like eating out.

Our friends over at Hinterhof recently shared with us a recipe for their Hot Beer Cheese Dip—a favorite of ours—and we just got all of the ingredients together for it this past weekend. Now they’ve given us the go-ahead to share the recipe with all y’all (see below).

For anyone who doesn’t know, Hinterhof‘s the all-vegan German kitchen + beer garden over in Highland Park and it’s one of our favorite places in all of Los Angeles. Like most restaurants right now, they’re relegated to take-out + delivery, but they’re making the best of it, not only for themselves but for their community.

They’ve started making vegan meals for first responders, hospitals, senior citizen centers, and others in-need through Support + Feed, an initiative created by Billie Eilish and her mom Maggie Baird to both support plant-based restaurants in this time of unparalleled economic crisis and feed the neediest and most at-risk in our community at the same time.

We encourage anyone in LA reading this to support Hinterhof by ordering from them; or, if you’re playing it extra-safe right now and not ordering form restaurants, you can donate directly to Support + Feed via Hinterhof’s site or theirs.

On to the recipe!

Note—we actually ran out tempeh, so no smokey tempeh included in the photo here, but it’s real good on there too. Another note—we actually halved the recipe and it worked out pretty great for the three of us. One more note—we also used an IPA (shout out, Three Weavers) since we didn’t have any Hefeweizen in-house, which we liked a lot but it did make for a more hoppy, bitter end-note. Ooh, final note—Blöde Kuh (see recipe) is actually delivering to a lot of Los Angeles and the OC right now (as is Three Weavers, come to think of it). Also, go vegan.

Hinterhof’s Warm Beer Cheese Dip
◊ 1/2 teaspoon extra virgin olive oil
◊ 1 tablespoon finely minced shallot
◊ 1 teaspoon finely minced garlic
◊ 1 tablespoon finely chopped jalapeño (if so desired)
◊ 12 ounces beer (they use Weihenstephan Hefeweizen)
◊ 8 ounces Blöde Kuh “Schmear This” vegan cream cheese
◊ 4 cups of your favorite vegan shredded cheddar cheese (we used Follow Your Heart, but also love Paremla’s)
◊ smokey tempeh, diced + sautéed
◊ green onions, chopped

Sautee shallot, jalapeño and garlic until fragrant. Add beer and bring to a gentle simmer. Add the cream cheese and stir with a wire whisk until cream cheese is melted + well-combined. Add cheddar shreds to the mixture and stir constantly until melted + smooth. Top with smokey tempeh + green onions (and maybe a sliced pepper), dig in! (Like this kid.)

We take inspiration where we can find it. Yes, that goes for the creative + design work you’ll find on the rest this site’s pages, but it also goes for all things culinary.

A bit back, we were partaking in our usual weekly visit to the Hollywood Farmers Market (the Santa Monica one gets all the glory in Los Angeles, but  let’s get real, LA, Hollywood is where it’s at in this case) when we saw that one of our favorite vendors, vegan yogurt + cheese maker, Blöde Kuh, was offering up a seasonal special—vegan BierKäse, the plant-based take on a German beer cheese.

Which, obviously, sounded awesome.

But what would we eat it on‽ Sure, we could resort to measly crackers, but soft pretzels seemed so much more worthy of this find. Alas, we’d never made a single pretzel between the two of us, and bringing outside food to our favorite pub or vegan German beer garden seemed…wie salt man? geschmacklos!

Thus an immediate need to make soft pretzels at home. The result—somewhat surprisingly for a first try—was most excellent, so we thought we’d share it here. It’s largely based on a non-vegan recipe we’d found, which itself is based on a recipe from an old blog by a Zurich-based baker, but what we ended up with through in-process trial and error differed enough from the originals even beyond the vegan-ization to warrant a re-write.

For the pretzels:
4 cups all-purpose flour
2 teaspoons salt
1 teaspoon sugar
1 cup lukewarm filtered water
2 packages active dry yeast
3 tbsp vegan butter, plus extra for brushing
Coarse salt for sprinkling

For the soda bath:
1/2 cup baking soda
2 quarts/8 cups filtered water

For starters, if you’re out of flour and need to buy some anyway, may we suggest King Arthur brand—this a totally unpaid, unprovoked endorsement, but they make a great product and are an employee-owned B corp., so all around great. On vegan butter, we really like Miyoko’s if you can get your hands on it.

Now that all the product endorsements are out of the way, with the butter, you want to set it out at room temperature so it softens but doesn’t totally melt. Set some extra aside—say a few more tablespoons—for brushing later; that can fully melt. Then start out by dissolving the two packets of yeast in the lukewarm water—if you’ve got a kitchen thermometer handy, we recommend between 100°-110°F; warm enough to activate the yeast, not so warm that it’ll kill it. Meanwhile, mix the flour + salt together in a large bowl and then form a well in the mixture. Add the sugar to the center of the well and then pour the yeast + water in. Let it rest for 15 minutes before mixing together. You should notice the mixture reacting and expanding over time.

Now add the softened butter to the bowl and mix everything together with either a dough hook on a low speed on your mixer or, if you’re more old-school/minimal, like us, mix with a wooden spoon until everything’s pretty well-incorporated. Then it’s time to get your hands dirty—knead together with your hands until you’ve got a smooth, consistent dough. In our experience, this takes both some muscle/persistence and a little extra water potentially to make sure the dough’s smooth enough and not too dry. Our hands were seriously tired by the time we got there. But we got there—persist! Let the dough (and your hands) rest for 30 minutes, covered with a napkin at room temperature (the dough, not yours hands).

Cut the dough into six equal parts, then roll each piece on a clean, un-floured surface to about 20 inches long. If you make the lengths of dough much shorter than 20 inches, they’ll be tough to form into their pretzel shapes, so keep carefully rolling out by hand, both on the table and in the air, letting gravity help you lengthen gently while avoiding tears or breaks.

To make the actual pretzel shape, place the dough lengths down on a parchment paper lined baking sheet in the form of a ‘U’. Then take each end and cross them over each other once, and the once more so you have a twist. Then just fold the twist down and press into what was the bottom of the ‘U’. We’ve found that using a little water before pressing them down will help bind the dough together. Place the tray(s) of pretzels in the fridge uncovered and let sit for about an hour, building up a skin that’ll help absorb the dipping solution when boiled and make for a more distinct crust.

Preheat the oven to 400°F and bring 2 quarts/8 cups of filtered water to a boil in a large stock pot. Carefully + slowly add the baking soda to the water—there will be a reaction that causes it to bubble up, so the slower the better and watch for any splashing. Once it’s calmed, you’re ready to boil—using a slotted spoon, carefully drop a pretzel in and submerge, boiling for only 10 second for so. Carefully remove, place on a lined baking sheet, and repeat with each of the pretzels.

With a sharp knife, score the lengths of the pretzel arms a bit to avoid crazy bubbles or bustin’. Brush with the reserve melted butter (or olive oil if you want) and sprinkle with coarse salt—if you can find it, they actually make pretzel salt that works great. Failing that, coarse sea salt should do the trick. If you want to get crazy, try a fancy smoked salt or that everything bagel mix from Trader Joe’s. Now bake for 20 minutes or so, until golden-brown and tough-to-the-touch. Remove from the oven, allow to cool, and brush with a little more butter or olive oil before serving.

Now grab a beer and your favorite spicy mustard or vegan cheese spread and enjoy! Prost!